


How to face paint
Introducing our step-by-step guide of everything you need to know about face paint. From choosing the right brush to activating your colours, introducing face paint 101.
What is Face Paint?
Face paint is an easy and fun way to get into character, not only for little ones but for adults too. It’s a wonderful way to bond with your children and the perfect activity to have at parties or festivals.
What can you do with face paint?
Almost anything you like! We’ve seen it all. From simple accents to head-to-toe creations, face paint allows you to be as creative as you like. Discover ideas and inspiration for your next face painting session here.
What do you need?
It’s not about being the best artist, even those who ‘can’t draw’ find face painting an easy activity. It’s great if you have a steady hand and a creative flare but equally if you’re up for learning a new skill – that’s all you need.
- A comfortable place to sit, we recommend opposite chairs in natural light.
- A glass of cold water or a spray bottle filled with cold water.
- A selection of brushes and sponges.
- Your favourite Snazaroo paints.
- A small towel or a few paper towels.
- A hairband, hair tie or clips to help tie hair away from the face.
- Paper or reusable cotton buds so you can edit any mistakes.
Optional extras:
Face Paint For Beginners?
- Decide what you are going to create and choose paints to match the look. We make three types of paint, Classic, Metallic and Sparkle.
- Activate your paint. This can be done with a brush or a sponge.
When using a brush:
- Soak the bristles in cold water.
- Rub the brush into the paint until it forms a creamy consistency.
- Wipe off the excess paint and you’re ready to get to work.
When using a sponge:
- Spray the paint and the sponge lightly with water.
- Rub the sponge into the paint until it’s covered in colour and apply it quickly to the skin.
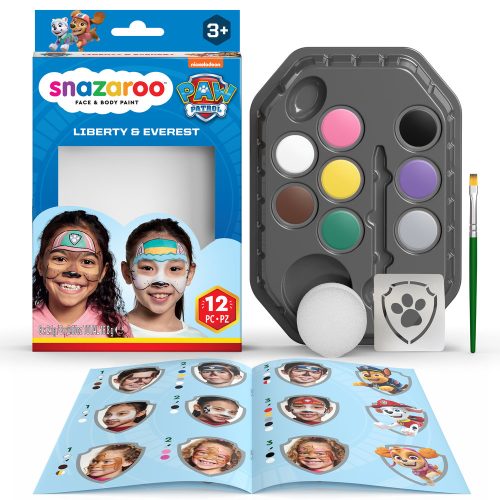
For more info, you can follow one of our handy guides or one of the guides in our ready-to-go kits.
Our Brushes
There are many types of brushes you can use to face paint, but each brush has a different purpose that will get you the best result.
This small brush is ideal for detailed work such as fine lines and small flourishes.
Use this brush when you want to draw more detailed designs and outlines. Perfect for when you need a steady hand.
This bestselling brush is a reliable all-rounder. Good for fine lines and details but you can also use it on its side for creating flat designs and shapes.
If you buy one brush to start your face painting journey, then this should be it. Soft and durable it provides good control and allows you to create thin lines, but it can also be used to fill in block colour. It’s a must have in any face painter’s kit.
Our Large Flat Brush creates thicker stripes and lines and can be used for filling in large spaces. Load it up with colour and get to work.
These super soft, long lasting sponges absorb paint well allowing you to distribute it evenly on the skin. Plus, they’re washable so you can use them again and again.
Use these stipple sponges to create stubbly beards, fluffy clouds and other ‘special effects’ such as grazed skin on Halloween inspired creations.
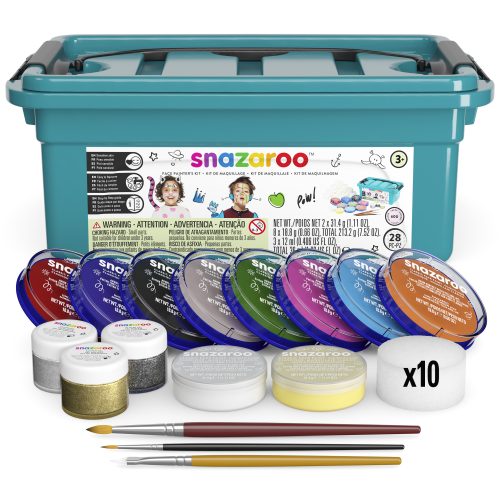
You can also find kits with all of our most useful brushes and other accessories here.
How to remove face paint?
All of our paints are water based and washable, so they come off easily with soap and warm water. You can use biodegradable baby wipes and makeup remover if you would prefer. It’s always a good idea to have some paper or reusable cotton buds on standby when doing face paint so that you can fix any mistakes, quickly and precisely.
Top Tips:
Here are some of our top tips for all face painting aficionados.
- Always store your paints in a cool, dark place.
- Never rinse your brushes past the bristles. This helps to protect the glue that holds the brush together.
- Store your brushes in a case to protect the bristles so they last for longer.
- After you rinse your brushes lay them flat, spaced apart from one another until they are completely dry.
- Wash and rinse your sponges with warm soapy water and make sure that they are dry before use.
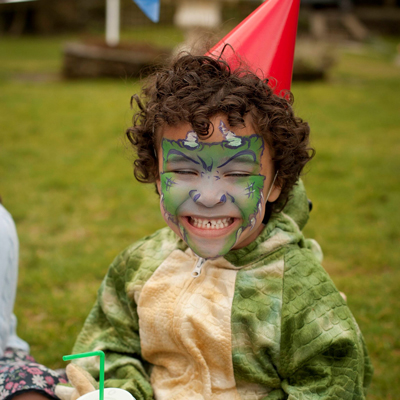
Tiger Face Paint Design
Whether your little one wants to be a ferocious big cat or a cuddly feline, this Tiger Face Paint design is the easiest way to get them into character.
Here we show you how to create the look using one of our easy-to-follow face charts.
What do you need?
- Cold water in a spray bottle or a glass.
- A sponge. Try our High Density Sponges.
- An easy-to-use brush. Try our Multi-Purpose Brush.
- A fine brush for smaller details. Try our Fine Round Brush.
- Classic Paints in:
- Bright Orange
- Bright Yellow
- Black
Step by step guide:
- Cut your sponge into quarters and spray or dampen them so they’re ready to use.
- Spray or dampen the Bright Yellow Paint to activate it and rub in the sponge so it’s covered in the paint.
- Use the shape of the sponge to dab the paint in a triangle above each eye, down the nose and onto the cheeks.
- Activate the Bright Orange Paint and rub a clean sponge into the colour until it’s loaded with paint.
- Outline the Bright Yellow Paint with the Bright Orange Paint using dabbing motions to blend them together.
- Activate the Black Paint and use the Multi-Purpose Brush to mix the paint into a creamy consistency.
- Use the natural shape of the brush to add stripes coming out from the centre of the face, from the eyebrows and across the cheeks.
- Use the Fine Round Brush to add detail to your design. Start by outlining ears above the eyebrows and add furry details to the cheeks. Flick the paint upwards at the tip of the nose to create a furry tiger nose and add dots and whiskers.
- Finally set your little ones free and watch them roarrrr as they start their animal adventure.
You can find more inspiration for your next Face Paint design here.
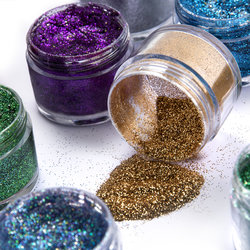
What are the differences between our three paint types?
One of the questions we often get asked is what are the differences between our three paint types? How do you use them and where should you use them? Here we break it down with one of our bestselling colours, purple.
Classic Paint
Our Classic Paints are great all-rounders. Rich in pigment without any sparkle or shine, they make perfect bases, provide medium coverage, and work well for fine detail and line work.
Check our Classic Face Paints here…
Metallic Paint
Our Metallic Paints are exceptionally rich in colour with a metallic sheen. They work well for adding detail and highlights to your favourite creations but because of their intense colour they also make great bases.
Discover our Metallic range here…
Sparkle Paint
Our Sparkle Paints are shimmery, sparkly and have an irresistible pearlescent shine. Like all of our paints, they’re pigment rich, so they work well for large areas, but they really come into their own when you use them for finer details and for adding a touch of ‘sparkle’ to your favourite looks.
Choose your Sparkle colours here…
All three of our paint types work well together. Try layering them on top of each other or using our stencils to create a look all of your own.
Did you know?
All of our Face Paints are made with skin-friendly ingredients from our base in Somerset, England. We never, ever test on animals. All of our products are suitable for sensitive skin, fragrance free and are super easy to wash off with water.
Top Tips:
- Always store your face paints in a cool dark area away from sunlight
- Always wash your brushes and sponges after each use. Soap and warm water work well as does natural shampoo.
New to face paint? Learn to face paint with our handy guides and discover more ideas, tips and techniques here.
Blending Two Colours
Did you know you can easily blend our Face Paints? Not only will this give you a new palette of colours, but it means you can create a pretty nifty two-tonal effect which is great for mermaids, fairies or for creating a mesmerising ombre effect.
It’s easy to do and once you master it, we guarantee it will be your go-to technique.
What do you need?
- A couple of your favourite Face Paints. We’re using our Sparkle Paints, Sparkle Lilac and Sparkle Pink for a more shimmery effect but all our Face Paints work well for blending.
- A clean sponge. Our High Density Sponges work perfectly.
- Cold water, in a spray bottle or a glass.
Step by step guide:
- Dampen your paints either with the spray bottle or with a few drops of water.
- Rub your sponge into one of your paints (don’t be afraid to be firm here) so that it gets saturated with colour.
- Using dabbing motions, apply the paint to the skin until you get your desired amount of coverage.
- Using the clean side of the sponge, rub it into the second paint colour and apply it to the skin using the same dabbing motion. Slightly apply it over the edge of paint number 1 so that they blend in nicely together.
- Go back over the skin with paint number 1, lightly dabbing it in so that you get the perfect cross contamination of colour.
It you want to create a more ‘ombre’ effect, start with a lot of colour and as you apply your sponge onto the skin begin to go lighter and lighter with the dabbing technique as you work your way through. This will help to create that faded colour effect.
Blend guide
Not all colours work well blended together. Give these combos a go:
- Blue x Green
- Green x Yellow
- Yellow x Orange
- Orange x Red
- Pink x Purple
- Gold x Silver
- Purple x Blue
- Blue x Turquoise
- Silver x Everything
- Gold x Everything
- Black x White
Blending with brushes
You can blend paints together using a brush to create your very own colours.
It’s important to always use a clean surface to blend paints with a brush. Try a plate, plastic tray or a paper plate. Ensure your brushes are clean before you add each new colour and never blend them together in the paint itself.
Blend look ideas
Here are some of our favourite looks that use blended paint to get a two-tonal effect.
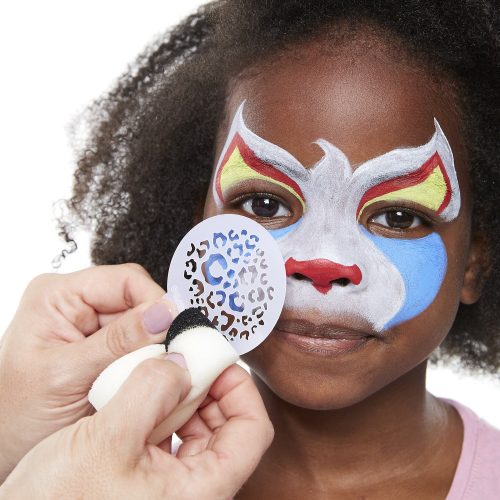
How to sponge stencils.
Why stencils?
New to face paints or simply short on time? We’ve got just the thing for you. Stencils are an easy way to create a desgin especially if you’re nervous about your brush skills, want to create more intricate designs or need to whip up a speedy look for lots of little ones at birthday parties or gatherings.
What do you need?
- Snazaroo Face Paints in your favourite colours. Use the Classic Face Paints when stencilling on large patches of skin and the Metallic or Sparkle Face Paints when stencilling over the top of designs.
- A sponge or two. We like to use our High Density Sponges.
- Cold water, in a spray bottle or a glass.
- The more the merrier. You can choose from our selection here.
How do they work?
Stencils are an easy and speedy way to create shapes, patterns or designs on the skin using a ‘dabbing’ technique (you can see how this works in the video below). Our reusable, flexible stencils conform easily to the curves of the body, arms, cheeks, legs and hands plus their adhesive backing means they stay in place while you use them.
You can see how to use our stencils in this video below.
Top Tips
- Always apply stencils to clean, dry skin.
- If using water in a glass rather than a spray bottle, use clean, fresh water.
- Rinse sponges thoroughly in between each colour change and after use.
- Let the paint dry a little before removing your stencil.
- Use a damp cloth to clean stencils in between each use.
- Ensure your stencils are completely dry before packing them away.
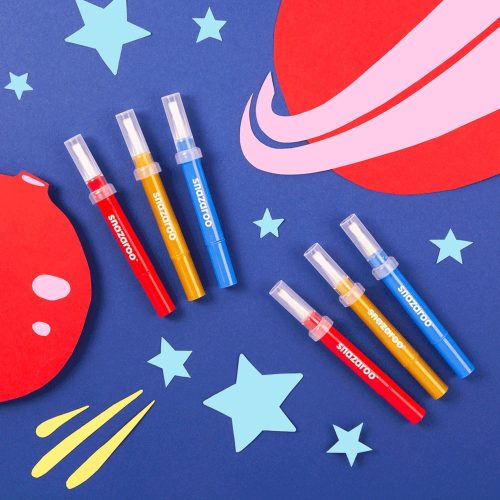
How to use our Brush Pens with Stencils
Our Brush Pens make face painting as easy as 1,2,3. With no brushes of water required, they’re easy to clean, easy to use and great for even the most novice of face painter. Did you know that you can also use them with our stencil packs, so it’s never been easier to create a memorable look.
Here we show you how to use them.
What do you need?
- Choose three of your favourite Brush Pen colours. We’re using our Brush Pen Adventure Pack to create this look.
- Pick a stencil pack of your choice. We’re using the flower stencils from our Fantasy Stencil Pack.
Step by step guide:
- Start by choosing where you want your design to be and ensure the skin is clean.
Try stencilling the face, arms and hands.
- Peel the stencil from the backing and press it firmly on the skin to make sure there are no gaps where paint could leak out from.
- Choose one of your colours (we’re using the Red Bush Pen) and twist the bottom of the pen to allow the paint to flow freely. Make sure the tip of the pen is not ‘overflowing’ with paint as it may seep under the stencil.
- Apply the paint to the stencil carefully filling in the petals.
- Use a second Brush Paint colour (we’re using the Blue Brush Pen) to paint over the stem.
- Finally use the third Brush Paint colour (we’re using the Gold Brush Paint) to paint the centre of the flowers.
- Let the paint dry for a few seconds before carefully peeling off the stencil, pulling away from the skin.
Our stencils are easy to use and can be re-used again and again. Flexible and washable, keep them on hand for parties and playtime or whenever you want to whip up a design quickly and easily.
Find out more and shop our easy-to-use stencils here.
How to create an easy butterfly look.
This butterfly look is perfect for parties, playtime and for little ones who won’t sit still for long. Super easy to re-create using a few of our face paints and super quick to wash off after a long day of fun. We’ve used one of our face charts to show you where to apply the paint. Save this blog to your phone or snap a photo of the finished creation so that you can look at it whilst you get to work.
What do you need?
- Just for the beginning. Remember to always let an adult do this if you are little.
- One of our High Density Sponges. Make sure you wash them in warm soapy water after each use so that you can use them over and over again
- Cold water, in a spray bottle or a glass.
- A selection of our washable face paints. We like to use our Classic Face Paints for this look but if you’re feeling extra creative, you can add a touch of sparkle with our Sparkle or Metallic Paints. You will need three colours for this look. We have used the Pale Pink, Classic White and Black Paints for our version.
Step by step guide:
- Start by cutting one of our High Density Sponges in half using the scissors and then safely put them away.
- Spray the sponge with cold water. You can dunk it in a glass of water if you don’t have a spray bottle. Just remember to squeeze out the excess water before use and rub it between your hands to warm it up getting rid of any excess moisture.
- Spray the Classic Pink Paint with water and rub in the sponge until it’s coated with the paint.
- Using the shape of the sponge, carefully dab on a triangle shape above and under both of the eyes. Make sure to fill in any gaps in the paint by dabbing the sponge (dragging it will leave streaks) against the skin.
- Spray the Classic Black Paint with water and coat the brush with the paint. Paint on long tear drop shaped lines followed by curved shapes on the outside edge of the triangle. Repeat on both sides, above and under the eyes.
- Paint two small tear drops on the ridge of the nose and swirly antenna on the forehead.
- Add water to the Classic White Paint to get a creamy consistency and load up a small paint brush with the paint.
- Using the tip of the brush apply dot patterns to the wings (remember that both sides need to mirror each other) and a starburst pattern to the forehead to finish off the look.
- Add Metallic or Sparkle Paints to the wings for a further glittery effect
Watch our handy guide here…
Face Painting Tips:
- Always apply paint to clean, dry skin.
- If using water in a glass rather than a spray bottle, use clean fresh water.
- Rinse brushes and sponges thoroughly in between each colour change and after each use.
- Let the paint dry a little before adding more paint.
- Use a damp cloth or paper cotton bud to remove or edit any mistakes.
Discover more face painting techniques and ideas here.
Rainbow Face Paint Design
This pretty rainbow design will be sure to brighten up your day. Now all that’s left to do is to find the pot of gold at the bottom…
Here we show you how to re-create the look using one of our easy-to-follow face charts.
What do you need?
- Cold water in a spray bottle or a glass.
- An easy-to-use brush. Try our Multi-Purpose Brush.
- Classic Paints in:
- Bright Red
- Bright Orange
- Bright Yellow
- Grass Green
- Sky Blue
- Classic White
- Black
Step by step guide:
- Spray or dampen the Bright Red Paint to activate it. Use a clean brush to mix the paint into a creamy consistency. If you add too much water the paint will become runny. If this happens use a paper towel to absorb some of the water, then start to mix again.
- Paint an arc shape from the edge of one eyebrow to the edge of the other eyebrow, across the forehead using the Bright Red Paint.
- Using a clean brush for each colour change, follow with the Bright Orange, Bright Yellow, Grass Green and Sky Blue paints ensuring that you stick to the colour order that’s found in nature. Red, orange, yellow, green, blue etc.
- Activate the Classic White Paint and with a clean brush, paint swirly cloud shapes using the thick side of the brush on to the edges of the eyes.
- Activate the Black Paint and with the tip of the brush use a small amount of the paint to add definition and texture to the clouds.
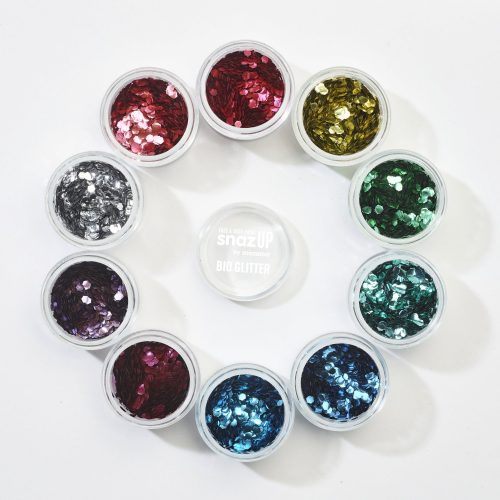
- You can finish the look with a touch of sparkle using our Glitter Dust and Glitter Gels and if you’re feeling really fancy why not use our Sparkle Paints to create a shimmery rainbow – perfect for parties, festivals and pride celebrations.
Meet our Pro Brushes
Find the perfect brush for your look with our selection of Pro Brushes.
Made from cruelty free Toray (a synthetic hair with incredible paint holding properties) all of our brushes are designed to be easy-to-use and feel great in your hand. Each brush offers a different technique and style of application so you can complete your look with perfection.
Here we break down our Pro Brushes so you know how and where to use them best.
Professional Face Paint Brush: Large Flat (White Brush)
£7.35
This thick, square brush is great for filling in block colours, covering large areas and perfecting the base of your favourite face paint design.
- Use this brush to create thick, wide lines by pressing the flat edge of the brush against the skin.
- Try filling in large surface areas with long sweeping motions.
- Use the edge of the brush to create very thin lines, fine details and the outline of designs.
Professional Face Paint Brush: Multi-Purpose (Red Brush)
£5.00
A general ‘all-rounder’ with good control and flexibility, this brush is a must have in all kits.
- Our bestselling brush is ideal for creating thick lines and teardrop shapes.
- Use this brush to fill in block colours and designs.
Professional Face Paint Brush: Medium Flat (Yellow Brush)
£4.45
Use the Medium Flat Brush to fill in large areas and use the pointed nib to apply fine details to your look.
- Use the thick edge of the brush against the skin to create thick lines.
- Press the pointed nib of the brush against the skin to create thin lines and details.
- Try pressing the brush against the skin to create a petal shape that can be used to create floral designs and scales for mermaids and sea creatures.
Professional Face Paint Brush: Fine Flat (Blue Brush)
£3.95
This small, flat, square brush is great for outlining designs with lots of colour.
- This is smaller version of the Large Flat Brush. Try using the flat edge of the brush to create short thick lines.
- Press the flat edge of the brush against the skin to create thin, fine lines.
Professional Face Paint Brush: Fine Round
£3.95
The flexible bristles of this brush make creating fluid details easy.
- This fine brush offers flexible brush control so you can create fine lines, swirls, dots and wavy lines.
- Great for outlining designs and for adding smaller details.
£3.45 for a pack of three
Our starter kits contain three of our most useful, affordable brushes. Available in Blue, Green and Pink, these compact brushes allow you to create different lines and designs on a budget.
How to look after your brushes
It’s important to look after your brushes so that they last for longer. Made from synthetic material they need to be kept clean and stored correctly. Here are our top tips for making your bushes last.
- Always use clean brushes in between each colour and for each new person.
- Clean your brushes with warm water and a gentle shampoo. We like these shampoos from Faith in Nature.
- Rinse your brushes thoroughly after washing and dry them by gently pressing out any excess water on an absorbent paper towel.
- For brushes with longer bristles such as our Multi-Purpose, Fine Round and Fine Flat brushes, gently twist the bristles and leave them twisted while they dry.
- Always lay your brushes on an absorbent paper towel or clean face cloth to dry them naturally. Never use a hairdryer.
- Store your brushes in a brush belt or brush case. Try not to overload the case or your brush bristles might get damaged.
Shop all of our Professional Brushes here…
Painting Flower Petals
These two-tonal flower petals are the easiest way to add a little bit of Summer to your look. Made using a simple double colour technique to get a pretty 3D effect that’s perfect for festival makeup, flower power vibes and little fairies.
Here we show you just how simple it is to create these pretty flower petals.
What do you need?
- A couple of your favourite Snazaroo face paint We’re using our Classic White and Dark Blue Paints.
- A clean brush. We recommend our Professional Multi-Purpose Face Paint Brush. Different brush shapes will create different patterns on the skin so feel free to experiment and see what you can come up with. You can check out our selection of brushes
- Cold water, in a spray bottle or a glass.
- Absorbent paper towel.
Step by step guide:
- Start by activating your paint (we’re using Dark Blue) by dampening it with water.
- Firmly rub the paintbrush into the damp paint to load up the brush with colour.
- Repeat with your second paint (we’re using Classic White). Remember to use a clean brush here.
- Gently rub the tip of the white paintbrush onto a dry paper towel then dip the tip of the same brush into the Dark Blue Paint.
- Now you have a fully loaded brush, place the tip of the brush onto the skin and push back to create a petal shape. This sounds more complicated than it really is. Check out the video below (maybe to the right etc dependant on where it is on the page) to see a visual step-by-step guide.
- Make sure you don’t slide the brush and you should see a pretty two-tonal effect on the skin.
- Fill out a flower shape. We’ve created a five-petal pattern but feel free to experiment with as many petals as you like and finish with a white dot in the centre.
You can use the same technique to create scales and to add pretty patterns to your favourite look. Get creative with colour and try using our Metallic Paints for an even jazzier effect.
Painting the finishing touches - Swirls, Teardrops and Dots
Add a little ‘pizazz’ to your look with these intricate yet easy to master, swirls, teardrops and dots. Great for fairies, princesses, angels and ice queens. Here we show you how create these flourishes and just how easy it is to finish off your look with these final touches.
What do you need?
- Your favourite Face Paint We’re using our Classic White Paint.
- A clean brush. We recommend our Professional Multi-Purpose Face Paint Brush. Made from Toray (a synthetic material) it allows users to have good control and the multi-functional, flexible bristles mean you can use it to create lots of different shapes and patterns on the skin.
- Cold water, in a spray bottle or a glass.
Step by step guide:
- Dampen your paint with water to activate it.
- Rub the paintbrush into the damp paint to load up the brush. Don’t be afraid to be firm here. You want a nice creamy consistency that stays on the brush. Swirl the bristles once you have the correct consistency and get ready to paint.
To Create Swirls:
- Use the point of the brush to paint swirly patterns on the skin. These should be free flowing so allow yourself to get creative here. Try painting swirls down the side of the face, on the cheek or over and around the eyebrow.
To Create Teardrops:
- Start with the point of the brush on the skin and drag it up pushing hard into the brush so you use the bristles to help you create the shape.
- Teardrops can be painted by placing the brush on the skin and flicking down using the natural shape and bristles of the brush to create the desired look.
To Create Dots
- These ones are super simple. Ensure you load the point of the brush with paint and apply dots to the skin. These look great around the eyes or on Butterfly Wings.
Try using a mix of colours to get a more textured effect.
Love Heart design using our Brush Pens
Create a memorable design with our easy-to-use Brush Pens. Use them like a felt tip pen to create intricate detail without any of the mess. No brushes to clean or water to mop up, plus they can be used on the go and by the smallest of hands. Here we show you just how easy it is to use our pens to create a heart design that’s perfect for weddings, cupid, or to simply share the love.
What do you need?
- A Brush Pen pack of your choice (We’re using our Fantasy Pack).
Step by step guide:
- Activate your pens by twisting the bottom of each pen to let the paint flow freely. Be careful not to overtwist the bottom or you might have too much paint.
- Choose where you want your design to be and begin by outlining the heart shape with your favourite colour (we’re using Bright Pink).
- Take your second favourite colour (we’re using Silver) and paint a smaller outline of a heart shape inside the bigger pink one.
- Choose your final paint and fill in the gap in the middle of your heart design to complete your look.
You can enhance your design with a few silver swirls on the outer edges or with some Glitter Dust or Glitter Gel.
Hygiene Seal
One of the questions we often get asked is about the layer of plastic that comes with each new Face Paint. Our hygiene seal is there to protect you and your little ones and to make sure that you feel safe when you use our products.
We’ve been making our Face Paints at our factory in Somerset since 1989. We’re proud of the levels of hygiene in our factory and this has never been more important than in the pandemic.
When you open a new pack of Face Paint, simply peel off the layer of plastic, and you’re ready for fun.
To keep your paints clean we recommend you:
- Always use clean brushes with every new user and try not to mix too many colours in one pan.
- Store your paint in a cool dry place away from damp air or damp surfaces.
- Wipe your paints with a damp tea towel in between each use and make sure they’re completely dry before putting them away.
For more information about our factory and how we make our skin-friendly products get in touch or check out our info page here.